Do you own a Doona stroller and want to change its cover without any mishaps?
Look no further!
In this comprehensive guide, we’ll walk you through the step-by-step process of removing and changing the Doona stroller cover, ensuring that you maintain its quality and durability.
Don’t miss out on this essential information â?let’s dive in!
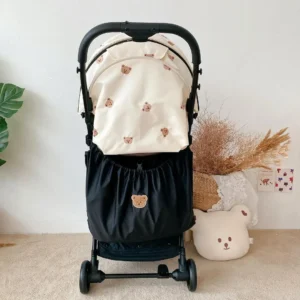
how to change doona stroller cover
To change the Doona stroller cover, follow these steps for proper removal and efficient replacement.
First, refer to the user guide provided by the manufacturer for specific instructions.
Remove any accessories or attachments from the stroller.
Then, locate the Velcro or zipper closures that secure the cover.
Carefully undo the closures, starting from the bottom and working your way up.
Gently pull the cover off, being cautious not to damage any parts.
Next, align the new cover with the stroller and secure it using the same closures in reverse order.
Ensure the cover is properly fitted and smooth out any wrinkles.
Avoid causing any damage to the cover by handling it gently and following the manufacturer’s guidelines.
Properly changing the Doona stroller cover not only maintains its quality but also ensures the safety and comfort of your child.
Key Points:
- Read the user guide for specific instructions
- Remove accessories or attachments from the stroller
- Find and undo the Velcro or zipper closures
- Carefully remove the cover, avoiding damage to any parts
- Align and secure the new cover using the same closures in reverse order
- Smooth out any wrinkles and ensure proper fitting
Check this out:
💡 Did You Know?
1. The term “doona” originated in Australia and refers to a type of padded comforter or quilt, commonly used as bedding in colder seasons.
2. Strollers, also known as prams or pushchairs, have been around since the 18th century when they were initially developed as a means for aristocratic families to showcase their wealth by parading their children in uniquely designed carriages.
3. The phrase “how to change the doona stroller cover” may seem straightforward, but did you know that stroller covers are also called “canopies” or “hoods,” and they are not only useful in protecting your child from rain or sun but also in providing a cozy, enclosed space for napping.
4. In the late 19th century, baby carriages faced social stigma as many believed they were detrimental to infants’ health and development. It took nearly two decades to convince skeptics that strollers were not only safe but beneficial in providing mothers with the freedom to move about with their babies.
5. Changing a doona stroller cover can be quite simple, as most covers are designed to be easily removable and washable. However, it’s interesting to note that the fabric used often undergoes rigorous safety testing, including flame resistance, durability, and colorfastness, to ensure it meets quality standards and provides a comfortable experience for both parent and child.
Removing A Doona Stroller Cover: A Step-By-Step Guide
To change the cover of a Doona stroller, follow these steps:
Locate the fastening points of the cover, typically located at the back and sides of the stroller. Gently unfasten these points by sliding your fingers underneath the cover and releasing the clasps. Avoid applying excessive force to prevent damage to the cover or stroller frame.
Detach the cover from the stroller frame. Start at one end and carefully lift the cover away from the frame, ensuring that no fabric gets caught or stretched. Depending on the Doona stroller model, you may also need to remove additional parts like the canopy or seat padding before fully removing the cover.
Inspect the stroller frame and clean any accumulated dirt or debris. This step ensures a clean surface for the new cover to be installed. Use a soft cloth or sponge along with mild soap to gently wipe down the frame and remove any stains or grime. Allow the frame to dry completely before proceeding to the next step.
Remember to be gentle when unfastening the cover to prevent damage.
- Avoid stretching or catching the fabric while detaching the cover.
- Clean the stroller frame using a soft cloth, sponge, and mild soap.
- Allow the frame to dry completely before installing the new cover.
Note: Following these steps will help you change the cover of your Doona stroller easily and effectively.
Changing A Doona Stroller Cover: Quick And Easy Steps
Now that you have successfully removed the old cover, it’s time to install a new one. Follow these quick and easy steps to change the Doona stroller cover:
- Start by aligning the new cover with the stroller frame. Ensure that the cover is properly positioned and that the openings for the handlebars and other components are correctly aligned.
- Begin attaching the cover to the frame by securing the fastening points. Slide your fingers underneath the cover and fasten the clasps or snaps back into place. Make sure each fastening point is securely closed.
- Once all the fastening points are secured, double-check the overall fit and alignment of the cover. Smooth out any wrinkles or creases, and adjust the openings for the handlebars and other components if necessary. Ensure that the cover is snug and fits tightly around the frame.
- As a final step, reattach any additional parts that were removed during the removal process, such as the canopy or seat padding. Follow the manufacturer’s instructions for proper installation of these components.
Preventing Damage: Tips For Safely Changing A Doona Stroller Cover
Changing a Doona stroller cover can be a delicate process, and taking precautions to prevent damage is essential. Here are some tips to help you safely change the cover without causing any harm:
Handle the cover with care: Be mindful of the fabric and avoid excessive tugging or pulling. Use gentle, controlled movements to remove and install the cover. This will prevent tears, fraying, or stretching of the material.
Remove and install in a clean area: Find a clean, spacious area where you can lay out the stroller and work on the cover without any obstructions. This will minimize the risk of dirt or debris coming into contact with the cover or stroller frame.
Follow the manufacturer’s instructions: Different models of Doona strollers may have specific instructions for removing and changing the cover. Consult the user manual or any accompanying documentation for detailed guidance. This will ensure that you are following the correct steps and utilizing any specific features of the stroller.
Avoid using excessive force: It’s important to apply just enough pressure to secure the cover without straining or damaging the clasps, snaps, or fastening points. Take your time and be patient during the process.
Maintaining Quality: Why Properly Handling A Doona Stroller Cover Is Crucial
Properly handling and changing a Doona stroller cover is crucial for maintaining its quality and longevity. By following the correct procedures, you can ensure that the cover remains in optimal condition and continues to provide comfort and protection for your child. Here’s why it’s important:
Protects the cover’s fabric: Treating the cover with care during removal and installation prevents unnecessary wear and tear. The fabric will maintain its texture, color, and overall integrity, allowing it to last longer.
Preserves the stroller’s appearance: Changing the cover without causing damage ensures that the stroller looks clean and well-maintained. A properly fitted cover enhances the overall aesthetic of the stroller, giving it a fresh and tidy appearance.
Ensures proper functionality: A well-maintained stroller cover will function as intended, providing adequate protection against the elements and maintaining your child’s comfort. Proper installation guarantees that the cover’s features, such as the canopy or seat padding, work effectively.
Saves time and money: By handling the cover correctly, you avoid unnecessary repairs or replacements. Taking the time to change the cover properly can help extend its lifespan, saving you the cost and inconvenience of purchasing a new one prematurely.
Protects the cover’s fabric
- Preserves the stroller’s appearance
- Ensures proper functionality
- Saves time and money
Expert Advice: How To Efficiently Remove And Change A Doona Stroller Cover
To efficiently remove and change a Doona stroller cover, it is important to follow these expert recommendations:
1. Plan ahead: Before beginning the process, ensure that you have enough time and a clear workspace. Rushing or working in a cramped area can result in mistakes or damage.
2. Use proper tools: Depending on the specific model of the Doona stroller, you may require specific tools or accessories for a smooth cover change. Check the manufacturer’s instructions or consult with a professional to determine if any specialized tools are needed.
3. Seek assistance if needed: Changing a stroller cover can be made easier with an extra set of hands. If you are finding it challenging to remove or install the cover on your own, do not hesitate to ask for help from a friend or family member.
4. Practice patience: Take your time and pay attention to detail. Rushing through the process can lead to mistakes or poor results. It is important to make slow and deliberate movements in order to achieve the best outcome.
Mastering The Task: Tips And Tricks For Smoothly Changing A Doona Stroller Cover
To master the task of changing a Doona stroller cover smoothly, consider these additional tips and tricks:
Familiarize yourself with the Doona stroller model: Each model may have different features or specifications. Understanding the specific details of your stroller will help you navigate the cover change more efficiently.
Keep a spare cover: Having a spare cover on hand can be beneficial, especially for situations where the existing cover needs immediate cleaning or repair. Switching out covers can be a convenient option if you need to use the stroller while the other cover is unavailable.
Regular maintenance: To prevent the need for frequent cover changes, practice regular maintenance of the stroller and cover. Wipe down the cover regularly to remove dirt or spills, and clean the stroller frame to avoid any build-up that may damage the cover over time.
By following these step-by-step guidelines, taking expert advice into account, and mastering the task with tips and tricks, you can confidently change the Doona stroller cover without any hassles or setbacks. Remember to prioritize proper handling to maintain the cover’s quality and prolong its lifespan, ensuring a comfortable and stylish experience for you and your child.
- Familiarize yourself with the Doona stroller model
- Keep a spare cover
- Regular maintenance
FAQ
Can you change the hood on a Doona stroller?
Yes, the Doona stroller gives you the option to change the hood. With a range of 7 different colors available, you can easily switch the canopy cover and the shoulder pads to give your Doona a fresh and personalized appearance. Whether you prefer a vibrant and bold shade or a more subtle and elegant tone, the versatility of the Doona stroller allows you to effortlessly modify its hood to suit your style preferences.
Can you take the cover off a Doona and wash it?
Yes, you can remove and wash the cover of a Doona. The seat cover, along with the shoulder pads and canopy, are designed to be easily removed for cleaning. To ensure you follow the proper cleaning instructions, it is advised to check the care label sewn on the seat cover. This label will provide you with the specific washing instructions to maintain the cleanliness and quality of your Doona.
When can I remove the Doona padding?
The Doona padding can be safely removed when your baby reaches approximately 3 months of age or weighs around 11 pounds, as mentioned on Doona’s website. At this stage, your baby would have developed better neck and head control, reducing the need for additional support provided by the infant insert. Removing the padding allows your baby to have more freedom of movement and provides a more comfortable experience as they continue to grow and explore their surroundings. However, it is essential to always consult the manufacturer’s guidelines and ensure your baby’s safety before removing any parts or features of the Doona.
How long is the life span of Doona stroller?
The innovative Doona Infant Car Seat & Stroller is engineered to provide optimal safety and comfort for infants throughout their first two years of life. With a weight capacity of up to 35 pounds or a height restriction of 32 inches, whichever comes first, this versatile stroller adapts to the changing needs and growth of your child. Its design ensures an enjoyable and secure ride from birth until your little one outgrows it, making it a reliable investment for your child’s early years.

